Jedi.el - Python auto-completion for Emacs
- Documentation (at GitHub Pages) [1]
- Q & A in StackOverflow (with emacs-jedi tag)
- Repository (at GitHub)
- Issue tracker (at GitHub)
- Travis CI

| [1] | There are released version and developmental version. |
What is it?
Jedi.el is a Python auto-completion package for Emacs. It aims at helping your Python coding in a non-destructive way. It also helps you to find information about Python objects, such as docstring, function arguments and code location.
Quick start
Install Jedi.el via el-get, Marmalade or MELPA (see install for more info), i.e., either
- M-x el-get-install RET jedi RET or
- M-x package-install RET jedi RET or
- (manually install...)
Configure Emacs using this:
(add-hook 'python-mode-hook 'jedi:setup)
(setq jedi:complete-on-dot t)                 ; optional
If you install Jedi.el manually (BTW, you shouldn’t!), you need to add more stuff to it. See manual install section.
Install Python server (jediepcserver.py) by running
- M-x jedi:install-server in Emacs
(see also jedi:install-server).
See install section for minimal examples.
Screenshots
Jedi.el comes with a set of useful features. Here is a list of screenshots to show some of them.

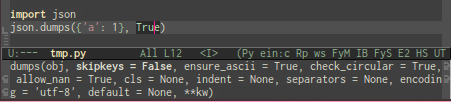
Auto-completion and popup help. This is the main feature of Jedi.el. You don’t need to type any special command. Completions and help popup as you type.

Popup-style call signature help. This is useful when you don’t remember what argument to pass.
eldoc-style call signature help. This is another style of showing arguments. Use jedi:tooltip-method to configure which style to use.
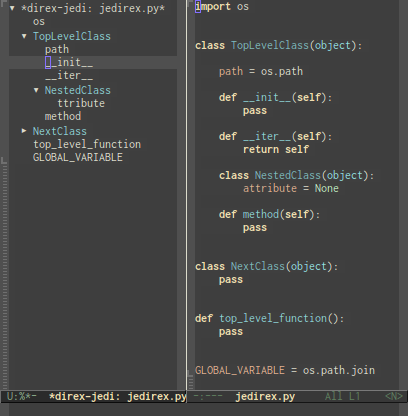
Source code viewer (need jedi-direx extension).
Requirements
Emacs
- EPC
- deferred.el (> v0.3)
- auto-complete
- python-environment.el
If your completion popup is broken when width of completion candidates is wide, try the newest version of popup.el.
Jedi.el is currently tested against Emacs 24.3-devel, 24.2 and 23.1.
Command line program
Python
- Jedi (>= 0.6.0)
- python-epc
- argparse (for Python 2.6)
Jedi.el is tested against Python 2.6, 2.7, 3.2 and 3.3.
Install
el-get
If you have el-get installed, Jedi.el can be installed by these Emacs command:
- M-x el-get-install RET jedi RET
- M-x jedi:install-server RET (see also Python server (jediepcserver.py) installation)
Note that Python packages are not installed automatically anymore (there is a plan to fix it).
Here is a minimal example to setup Jedi.el via el-get:
;; Standard el-get setup
;; (See also: https://github.com/dimitri/el-get#basic-setup)
(add-to-list 'load-path "~/.emacs.d/el-get/el-get")

(unless (require 'el-get nil 'noerror)
  (with-current-buffer
      (url-retrieve-synchronously
       "https://raw.github.com/dimitri/el-get/master/el-get-install.el")
    (goto-char (point-max))
    (eval-print-last-sexp)))

(el-get 'sync)


;; Standard Jedi.el setting
(add-hook 'python-mode-hook 'jedi:setup)
(setq jedi:complete-on-dot t)

;; Type:
;;     M-x el-get-install RET jedi RET
;;     M-x jedi:install-server RET
;; Then open Python file.
See also: Use minimal example setting to try Jedi.el without installation.
package.el (Marmalade or MELPA)
You can install Jedi.el using package.el interface. You need to add Marmalade or MELPA to package-archives.
After you setup package-archives properly, Jedi.el can be installed by these Emacs command:
- M-x package-install RET jedi RET
- M-x jedi:install-server RET (see also Python server (jediepcserver.py) installation)
Here is a minimal example to setup Jedi.el via package.el + MELPA:
;; Standard package.el + MELPA setup
;; (See also: https://github.com/milkypostman/melpa#usage)
(require 'package)
(add-to-list 'package-archives
             '("melpa" . "http://melpa.milkbox.net/packages/") t)
(package-initialize)


;; Standard Jedi.el setting
(add-hook 'python-mode-hook 'jedi:setup)
(setq jedi:complete-on-dot t)

;; Type:
;;     M-x package-install RET jedi RET
;;     M-x jedi:install-server RET
;; Then open Python file.
See also: Use minimal example setting to try Jedi.el without installation.
Manual install
- Install EPC and auto-complete.
- Install Jedi.el. Download the repository of Jedi.el and add it to load-path.
- Add (autoload 'jedi:setup "jedi" nil t) in your Emacs configuration.
- Run M-x jedi:install-server RET (see also Python server (jediepcserver.py) installation)
Python server (jediepcserver.py) installation
As of Jedi.el v0.2.0, jediepcserver.py installation is done by running Emacs command jedi:install-server, i.e., typing M-x jedi:install-server RET in Emacs. The same command can be used to update Python packages used by Jedi.el. So, running this command after updating Jedi.el each time is recommended.
You can configure the location of the Python packages installed by jedi:install-server by changing the following variables:
- jedi:environment-root
- python-environment-directory
- python-environment-default-root-name
If you want to install Python packages manually, rather than using jedi:install-server, see Manually install Python server (jediepcserver.py) below.
Manually install Python server (jediepcserver.py)
Install jediepcserver.py script to wherever you want. For example, you can use...
pip:
pip install -U PATH/TO/EMACS-JEDI/
setup.py directly:
cd PATH/TO/EMACS-JEDI/
python setup.py install
Then find where your jediepcserver.py ends up. Set the location by:
(setq jedi:server-command '("PATH/TO/jediepcserver.py"))
See also jedi:server-command.
Setup
All you need to do is to call jedi:setup in python buffer. To do that, add the following in your Emacs configuration:
(add-hook 'python-mode-hook 'jedi:setup)
Extension
IPython integration
Sometimes it is useful to find completion using Python interpreter. To do that in a seamless manner, you can use IPython and its Emacs binding EIN (Emacs IPython Notebook). See ein:jedi-setup in the EIN manual. Using this setup, you can run auto-completion command in Jedi.el and EIN simultaneously.
Configuration
- function jedi:setup
Fully setup jedi.el for current buffer. It setups ac-sources (calls jedi:ac-setup) and turns jedi-mode on.
This function is intended to be called from python-mode-hook, like this:
(add-hook 'python-mode-hook 'jedi:setup)
You can also call this function as a command, to quickly test what jedi can do.
- function jedi:ac-setup
Add Jedi AC sources to ac-sources.
If auto-completion is all you need, you can call this function instead of jedi:setup, like this:
(add-hook 'python-mode-hook 'jedi:ac-setup)
Note that this function calls auto-complete-mode if it is not already enabled, for people who don’t call global-auto-complete-mode in their Emacs configuration.
- variable (jedi:complete-on-dot nil)
Non-nil means automatically start completion after inserting a dot. To make this option work, you need to use jedi:setup instead of jedi:ac-setup to start Jedi.
- variable (jedi:environment-root nil)
Name of Python environment to use. If it is nil, python-environment-default-root-name is used.
You can specify a full path instead of a name (relative path). In that case, python-environment-directory is ignored and Python virtual environment is created at the specified path.
- variable (jedi:environment-virtualenv nil)
virtualenv command to use. A list of string. If it is nil, python-environment-virtualenv is used instead.
You must set non-nil value to jedi:environment-root in order to make this setting work.
- variable (jedi:server-command '("~/.emacs.d/.python-environments/default/bin/jediepcserver.py"))
Command used to run Jedi server.
Note
If you used jedi:install-server (recommended) to install Python server jediepcserver.py, you don’t need to mess around with jediepcserver.py. Jedi.el handles everything automatically.
If you install Python server jediepcserver.py using jedi:install-server command, jedi:server-command should be automatically set to:
'("~/.emacs.d/.python-environments/default/bin/jediepcserver.py")
Otherwise, it is set to:
'("python" "JEDI:SOURCE-DIR/jediepcserver.py")
Note
If you installed jediepcserver.py manually, then you have to set jedi:server-command appropriately.
If you can run jediepcserver.py --help in your shell, then you can simply set:
(setq jedi:server-command '("jediepcserver.py"))
Otherwise, you need to find where you installed jediepcserver.py then set the path directly:
(setq jedi:server-command '("PATH/TO/jediepcserver.py"))
If you want to use a specific version of Python, setup jedi:environment-virtualenv variable appropriately and reinstall jediepcserver.py.
If you want to pass some arguments to the Jedi server command, use jedi:server-args instead of appending them jedi:server-command.
- variable (jedi:server-args nil)
Command line arguments to be appended to jedi:server-command.
If you want to add some special sys.path when starting Jedi server, do something like this:
(setq jedi:server-args
      '("--sys-path" "MY/SPECIAL/PATH"
        "--sys-path" "MY/OTHER/SPECIAL/PATH"))
If you want to include some virtualenv, do something like the following. Note that actual environment variable VIRTUAL_ENV is treated automatically so you don’t need to pass it. Also, you need to start Jedi EPC server with the same python version that you use for the virtualenv.:
(setq jedi:server-args
      '("--virtual-env" "SOME/VIRTUAL_ENV_1"
        "--virtual-env" "SOME/VIRTUAL_ENV_2"))
To see what other arguments Jedi server can take, execute the following command:
python jediepcserver.py --help
Advanced usage
Sometimes you want to configure how Jedi server is started per buffer. To do that, you should make this variable buffer local in python-mode-hook and set it to some buffer specific variable, like this:
(defun my-jedi-server-setup ()
  (let ((cmds (GET-SOME-PROJECT-SPECIFIC-COMMAND))
        (args (GET-SOME-PROJECT-SPECIFIC-ARGS)))
    (when cmds (set (make-local-variable 'jedi:server-command) cmds))
    (when args (set (make-local-variable 'jedi:server-args) args))))

(add-hook 'python-mode-hook 'my-jedi-server-setup)
Note that Jedi server run by the same command is pooled. So, there is only one Jedi server for the same set of command. If you want to check how many EPC servers are running, use the EPC GUI: M-x epc:controller. You will see a table of EPC connections for Jedi.el and other EPC applications.
If you want to start a new ad-hoc server for the current buffer, use the command jedi:start-dedicated-server.
- variable (jedi:get-in-function-call-timeout 3000)
Cancel request to server for call signature after this period specified in in millisecond.
- variable (jedi:get-in-function-call-delay 1000)
How long Jedi should wait before showing call signature tooltip in millisecond.
- variable (jedi:tooltip-method '(pos-tip popup))
Configuration for jedi:tooltip-show. This is a list which may contain symbol(s) pos-tip and/or popup. It determines tooltip method to use. Setting this value to nil means to use minibuffer instead of tooltip.
- variable (jedi:goto-definition-config '((nil nil nil) (t nil nil) (nil definition nil) (t definition nil) (nil nil t) (t nil t) (nil definition t) (t definition t)))
Configure how prefix argument modifies jedi:goto-definition behavior.
Each element of the list is arguments (list) passed to jedi:goto-definition. Note that this variable has no effect on jedi:goto-definition when it is used as a lisp function
The following setting is default (last parts are omitted). Nth element is used as the argument when N universal prefix arguments (C-u) are given.:
(setq jedi:goto-definition-config
      '((nil nil        nil)        ; C-.
        (t   nil        nil)        ; C-u C-.
        (nil definition nil)        ; C-u C-u C-.
        (t   definition nil)        ; C-u C-u C-u C-.
        ...))
For example, if you want to follow “substitution path” by default, use the setting like this:
(setq jedi:goto-definition-config
      '((nil definition nil)
        (t   definition nil)
        (nil nil        nil)
        (t   nil        nil)
        (nil definition t  )
        (t   definition t  )
        (nil nil        t  )
        (t   nil        t  )))
You can rearrange the order to have most useful sets of arguments at the top.
- variable (jedi:goto-definition-marker-ring-length 16)
Length of marker ring to store jedi:goto-definition call positions
- variable (jedi:doc-mode 'rst-mode)
Major mode to use when showing document.
- variable (jedi:doc-display-buffer 'display-buffer)
A function to be called with a buffer to show document.
[EXPERIMENTAL] If t, use Jedi to create imenu index. To use this feature, you need to install the developmental version (“dev” branch) of Jedi.
imenu-create-index-function for Jedi.el. It must be a function that takes no argument and return an object described in imenu--index-alist. This can be set to jedi:create-flat-imenu-index. Default is jedi:create-nested-imenu-index.
Keybinds
- <C-tab> jedi:complete
Complete code at point.
- C-c ? jedi:show-doc
Show the documentation of the object at point.
- C-c . jedi:goto-definition
Goto the definition of the object at point.
See jedi:goto-definition-config for how this function works when universal prefix arguments (C-u) are given. If numeric prefix argument(s) (e.g., M-0) are given, goto point of the INDEX-th result. Note that you cannot mix universal and numeric prefixes. It is Emacs’s limitation. If you mix both kinds of prefix, you get numeric prefix.
When used as a lisp function, popup a buffer when OTHER-WINDOW is non-nil. DEFTYPE must be either assignment (default) or definition. When USE-CACHE is non-nil, use the locations of the last invocation of this command. If INDEX is specified, goto INDEX-th result.
- C-c , jedi:goto-definition-pop-marker
Goto the last point where jedi:goto-definition was called.
- variable (jedi:use-shortcuts nil)
If non-nil, enable the following shortcuts:
Command
- function jedi:stop-server
Stop Jedi server. Use this command when you want to restart Jedi server (e.g., when you changed jedi:server-command or jedi:server-args). Jedi srever will be restarted automatically later when it is needed.
- function (jedi:start-dedicated-server command)
Start Jedi server dedicated to this buffer. This is useful, for example, when you want to use different sys.path for some buffer. When invoked as an interactive command, it asks you how to start the Jedi server. You can edit the command in minibuffer to specify the way Jedi server run.
If you want to setup how Jedi server is started programmatically per-buffer/per-project basis, make jedi:server-command and jedi:server-args buffer local and set it in python-mode-hook. See also: jedi:server-args.
- function (jedi:complete &rest --cl-rest--)
Complete code at point.
- function jedi:get-in-function-call
Manually show call signature tooltip.
- function (jedi:goto-definition &optional other-window deftype use-cache index)
Goto the definition of the object at point.
See jedi:goto-definition-config for how this function works when universal prefix arguments (C-u) are given. If numeric prefix argument(s) (e.g., M-0) are given, goto point of the INDEX-th result. Note that you cannot mix universal and numeric prefixes. It is Emacs’s limitation. If you mix both kinds of prefix, you get numeric prefix.
When used as a lisp function, popup a buffer when OTHER-WINDOW is non-nil. DEFTYPE must be either assignment (default) or definition. When USE-CACHE is non-nil, use the locations of the last invocation of this command. If INDEX is specified, goto INDEX-th result.
- function jedi:goto-definition-pop-marker
Goto the last point where jedi:goto-definition was called.
- function jedi:show-doc
Show the documentation of the object at point.
Find related names of the object at point using helm interface.
Find related names of the object at point using anything interface.
- function jedi:install-server
This command installs Jedi server script jediepcserver.py in a Python environment dedicated to Emacs. By default, the environment is at ~/.emacs.d/.python-environments/default/. This environment is automatically created by virtualenv if it does not exist.
Run this command (i.e., type M-x jedi:install-server RET) whenever Jedi.el shows a message to do so. It is a good idea to run this every time after you update Jedi.el to sync version of Python modules used by Jedi.el and Jedi.el itself.
You can modify the location of the environment by changing jedi:environment-root and/or python-environment-directory. More specifically, Jedi.el will install Python modules under the directory PYTHON-ENVIRONMENT-DIRECTORY/JEDI:ENVIRONMENT-ROOT. Note that you need command line program virtualenv. If you have the command in an unusual location, use python-environment-virtualenv to specify the location.
Note
jediepcserver.py is installed in a virtual environment but it does not mean Jedi.el cannot recognize the modules in virtual environment you are using for your Python development. Jedi EPC server recognize the virtualenv it is in (i.e., the environment variable VIRTUAL_ENV in your Emacs) and then add modules in that environment to its sys.path. You can also add --virtual-env PATH/TO/ENV to jedi:server-args to include modules of virtual environment even you launch Emacs outside of the virtual environment.
Note
It is highly recommended to use this command to install Python modules for Jedi.el. You still can install Python modules used by Jedi.el manually. However, you are then responsible for keeping Jedi.el and Python modules compatible.
See also:
- function jedi:pop-to-epc-buffer
Open the buffer associated with EPC server process. Use this command to see the output (e.g., traceback) of the server process.
- function jedi:toggle-log-traceback
Toggle on/off traceback logging for EPC server for the current buffer. When there is an error during traceback logging is enabled, traceback is printed in the EPC buffer. You can use jedi:pop-to-epc-buffer to open that buffer.
You can also pass --log-traceback option to jediepcserver.py to start server with traceback logging turned on. This is useful when there is a problem in communication (thus this command does not work). You can use jedi:start-dedicated-server to restart EPC server for the current buffer with specific arguments.
- function jedi:toggle-debug-server
Setup jedi:server-command and jedi:server-args to debug server using pdb or ipdb.
When this command is called, it essentially execute the following code:
(jedi:stop-server)
(setq jedi:server-command (list "cat" "jedi-port.log" )
      jedi:server-args nil)
It means to pass the port number recorded in the file jedi-port.log to EPC client.
To start Jedi server in terminal and record port to the file, use the following command:
python jediepcserver.py --port-file jedi-port.log --pdb
This command will be copied in the kill-ring (clipboard) when this command is called. You can use –ipdb instead of –pdb to use ipdb instead of pdb.
Calling this command again restores the original setting of jedi:server-command and jedi:server-args then stops the running server.
- function jedi:show-setup-info
Show installation and configuration info in a buffer. Paste the result of this function when asking question or reporting bug. This command also tries to detect errors when communicating with Jedi EPC server. If you have some problem you may find some information about communication error.
- function jedi:show-version-info
Show version info of Python modules used by the server. Paste the result of this function in bug report.
Troubleshooting
Note
If you have a question, ask question in StackOverflow with emacs-jedi tag. We stopped using the issue tracker for Q & A.
Before posting question in StackOverflow or bug report in the issue tracker, please investigate the problem by yourself. Here is some checklist.
It is best to mention that you went through this list (or stuck with somewhere) in your question or bug report.
Run M-x jedi:show-setup-info RET (if you don’t have it, try jedi:show-version-info instead). This helps you in two ways.
Paste the result of this function when you are asking question or reporting bug, to give people basic information.
Unless you are sure that it is irrelevant, it is recommended to put this information. If you think it is too long for a simple question/report, you can always use https://gist.github.com etc.
To make sure jedi.el is running correctly and communicating with Jedi EPC server.
This is the least complex way to communicate with the Jedi server. If it doesn’t work, rest of Jedi.el functions will not work.
You can try Jedi.el without installing it, in a “clean Emacs setup” [2] . If you don’t know what is wrong and don’t know what to do next, this it the best thing to try. This helps you to find out if your setting is wrong or if it is actually a bug in Jedi.el.
Check How to quickly try Jedi.el without installing it. If it works, compare with your Emacs setup carefully. It is likely that there is something wrong in your Emacs setup. You should also check minimal working examples in the install section.
(Note that currently there is no automated way to do this in Windows without Cygwin. If you know it, please document!)
To check that jedi:setup is called properly via python-mode-hook, run M-: jedi-mode RET in some Python file. It should return t.
If you see message “auto-complete-mode is not enabled”, you might forget to setup auto-complete properly. Calling (global-auto-complete-mode t) in your Emacs configuration after loading auto-complete should solve this problem.
“After loading” means you need to call (require 'auto-complete) (or (require 'auto-complete-config) if you need) before calling (global-auto-complete-mode t).
It is possible that Jedi’s keybind conflicts with keybinds of other libraries. You can check the definition of keybind by <f1> k C-c ? (or C-h instead of <f1>), for example. This one should show the help for jedi:show-doc.
If you get something like deferred error : (error ...) in your echo area (equivalently, the *Messages* buffer), most of the time the error is from Python-Jedi. Get traceback following “How to get traceback” and see where the error is from. If it is from Python-Jedi, send the bug report to its issue tracker.
Make sure you are reading right version of document. If you are using developmental version (installed via el-get, MELPA or manually from github), you should read developmental version. If you installed from Marmalade, you should read released version.
| [2] | By “clean Emacs setup” I mean a Emacs process started in such a way that it does not read your Emacs configuration file and libraries installed by you. In this manual, several ways to do that are described. See How to quickly try Jedi.el without installing it. |
FAQ
How to quickly try Jedi.el without installing it
There are two ways. One for new users and one for Jedi.el developers.
- Use minimal example setting to try Jedi.el without installation
- Use make tryout to try Jedi.el without installation
Use minimal example setting to try Jedi.el without installation
This is recommended if you are new to Jedi.el.
Try Jedi.el without installation using package.el + MELPA
Here is how to try el-get setup without touching your ~/.emacs.d/. This version uses package.el and MELPA. Once emacs is launched, type M-x package-install RET jedi RET and M-x jedi:install-server RET:
mkdir /tmp/test/    # any location is fine
cd /tmp/test/
wget --no-check-certificate https://raw.github.com/tkf/emacs-jedi/master/doc/source/jedi-melpa.el
HOME=${PWD} emacs -Q -l jedi-melpa.el
Try Jedi.el without installation using el-get
If you want to try el-get setup, do the following instead. You may remove --eval "(setq el-get-install-skip-emacswiki-recipes nil)" like the last commented line, but it will be very slow to start Emacs. Once emacs is launched, type M-x el-get-install RET jedi RET and M-x jedi:install-server RET
mkdir /tmp/test/    # any location is fine
cd /tmp/test/
wget --no-check-certificate https://raw.github.com/tkf/emacs-jedi/master/doc/source/jedi-el-get.el
HOME=${PWD} emacs -Q --eval "(setq el-get-install-skip-emacswiki-recipes nil)" -l jedi-el-get.el
# HOME=${PWD} emacs -Q -l jedi-el-get.el
The above methods run minimal example mentioned in the install section.
Note
In older Emacs version (< 24.4), the method 1 using package.el may result in an error something like
jedi.el:37:1:Error: Cannot open load file: python-environment
In this case, M-x package-install RET python-environment RET may solve the problem.
Use make tryout to try Jedi.el without installation
This is recommended if you want to develop Jedi.el. If you have cask command, then you just have to:
git clone https://github.com/tkf/emacs-jedi.git
cd emacs-jedi
make tryout
If you are too lazy to go to cask site to checkout how to install it, here is what you need to do:
curl -fsSkL https://raw.github.com/cask/cask/master/go | python
make CASK=$HOME/.cask/bin/cask tryout
make tryout will install requirements for Jedi.el separated from your local setup in ~/.emacs.d/. You can also check the configuration file tryout-jedi.el to see a minimum working configuration. This is the configuration file loaded by make tryout.
If you install cask in a different place or you don’t add it to the $PATH, you can call make like this: make CASK=PATH/TO/bin/cask tryout. Typically, PATH/TO/bin/cask is ~/.cask/bin/cask.
How to update Python dependencies
Simply run Emacs command M-x jedi:install-server. See also jedi:install-server.
Warning
The following command does not work as of version 0.2.0 anymore:
make requirements
pip install -r PATH/TO/requirements.txt
Warning
(For el-get user) M-x el-get-update RET jedi RET will not update Python dependencies anymore.
How to use Python 3 (or any other specific version of Python)
Using Python 3 as default Python, only in Jedi.el
Set jedi:environment-virtualenv and jedi:environment-virtualenv, like this:
(setq jedi:environment-root "jedi")  ; or any other name you like
(setq jedi:environment-virtualenv
      (append python-environment-virtualenv
              '("--python" "/PATH/TO/python3")))
Or you can just set, for example, virtualenv3 if it is run by Python 3:
(setq jedi:environment-virtualenv
      (list "virtualenv3" "--system-site-packages"))
Note
--system-site-packages is the default option in python-environment-virtualenv so you need it if you want to the default behavior. As to why it is the default, see the discussion here: tkf/emacs-python-environment#3.
Note
In principle, you can modify python-environment-virtualenv and do not touch jedi:environment-virtualenv and jedi:environment-root. However, it changes default environment to use Python 3 so make sure all other Python packages you need are compatible with Python 3.
Automatically use appropriate Python version
This can be done by making jedi:server-command, jedi:environment-root and jedi:environment-virtualenv buffer local using make-local-variable and set them appropriately. See jedi:server-command for more info. You might need to use python-environment-bin.
How to setup proxy
jedi:install-server runs pip install. So, you may want to set proxy for it. In that case, set http_proxy and https_proxy [3].
If you want to set it in ~/.bashrc, do something like the following. Since Emacs [4] and other programs read this variable, it may be the best approach.:
export http_proxy=http://[user:passwd@]proxy.server:port
export https_proxy=https://[user:passwd@]proxy.server:port
If you want to set it in Emacs setting, do something like this:
(setenv "http_proxy" "http://[user:passwd@]proxy.server:port")
(setenv "https_proxy" "https://[user:passwd@]proxy.server:port")
If you want to setup proxy only for pip, you can use PIP_PROXY instead of http_proxy and https_proxy. This sets default value for pip –proxy option (see also pip > User Guide > Environment Variables).
| [3] | See also: http://stackoverflow.com/questions/14149422/using-pip-behind-a-proxy (BTW, http_proxy and https_proxy are not mentioned in pip manual. If anybody know official information from pip regarding http_proxy and https_proxy, please add it here.) |
| [4] | Proxies - URL Programmer’s Manual |
How to get traceback
You need to toggle on traceback logging for EPC server and then run jedi:pop-to-epc-buffer when you get an error. To start traceback logging, there are several options.
If server-client communication works (i.e., some completion or command work), use jedi:toggle-log-traceback.
Alternatively, you can start server with --log-traceback option by jedi:start-dedicated-server. Run command by M-x jedi:start-dedicated-server RET and append --log-traceback to the default command.
You can use jedi:server-args to turn on logging always. This could be useful when you don’t know when the error occurs.:
(setq jedi:server-args '("--log-traceback"))
How it works
Jedi.el uses jedi (an awesome Python auto-completion library) and EPC (an RPC stack for Emacs Lisp) and its Python binding to communicate with Python process. It also uses excellent Emacs auto-complete module to start completion automatically. As Jedi.el always calls Python function asynchronously (thanks to EPC), it will not block your Emacs while your are editing.
How Jedi.el works. Jedi.el calls Python methods in jedi through EPC protocol. Emacs side implementation of EPC is epc.el and Python side is python-epc. Message through socket is encoded using S-expression based protocol. See EPC README file for more details.

EPC is built on top of asynchronous library called deferred.el. One of the design goal for Jedi.el is to never block user. This is extremely important thing to have in mind because you use Emacs to edit something, not to wait some random lisp program to finish. EPC and deferred.el are perfect libraries to achieve this goal.